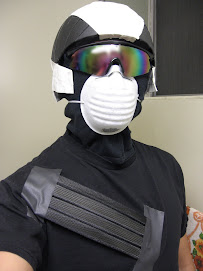
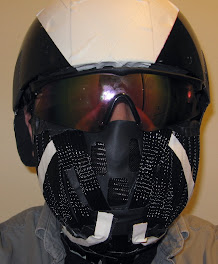
 Still a rough, but looking much more like the final product now. It's only held together with tape right now, but when I get a final overall shape done, I'll attach the braided tubes permanently either with glue or by sewing them on.
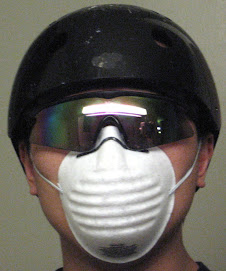
Direct flash doesn't do the new mask any justice, but I usually can only work on this at night and available light is too dim. I took a closeup photo of just the new mask that will hopefully show some of the details a little better.
I still need to make the bridge of the nose that connects with the goggles.  To prevent the goggles from fogging up (or at least minimize it), I'm going to glue on some strips of foam across the inside of the cheeks to act sort of like weather stripping. This should keep my breath from traveling up the mask and fogging up the lenses by forcing it to go either down or out through the vents in the front.
Saturday, March 29, 2008
Day 34 - Rough Mask
Sunday, March 23, 2008
Day 28 - Custom Mannequin

 On a side note, who knew this project would be such a multi-disciplinary endeavor? Sewing, shoemaking, vacuum forming, mold-making, and now mannequins...whew! Thankfully, the mannequin will be reuseable for anything else I decide to tackle (maybe not literally, since it takes so damn long to make one. Badum CHING).
Friday, March 21, 2008
Day 26 - More Armor
 I've started doing a paper mockup of the arrangement for the muscle armor. (It's made from old reports and faxes from work, so I'm doing what I can to recycle.) I'll be making most if not all of the armor initially in paper so I don't waste any of the more expensive materials. You know what they say: measure twice, cut once. This version needs some tweaking of the proportions (as you can probably tell, I'm not quite as muscular as the Delta Force guys in the game), and the angles of the collarbone area are a little too steep I think, but it's a start. I think when it gets down to the actual materials, I'll have to make a flat paper pattern (like with normal sewing projects) in addition to this mockup so I can align all the pieces properly.
I haven't made much progress on the boots yet, because I still have to figure out how to cover it with the straps properly (glue or sew?) and how to make the back ankle area. I was thinking of either cannibalizing an old pair of inline skates or fabricating it from scratch with plastic or craft foam.
Thursday, March 13, 2008
Day 18 - Putting on a New Face (Mask)
 I made a negative mold of my face last night out of Sculpey and aluminum foil (with a plastic-wrapped bowl as support), but when I went to vacuum form with it, I realized that I ran out of craft foam to do it. Damn! And it was too late to pick up any more, so I had to wait until after work today to get some.
So after I vacuum formed the foam, I started trimming away the excess. (Sorry, forgot to take pictures of the process.) Next, I applied strips of 1" gaffer's tape to strengthen the foam. I knew breathing/fogging would be a problem, so I  experimented with ever expanding holes for my nose and mouth. Finally, I decided to cut out the whole area and cover it with a sheet from the braided tubing (cut up the side). That seemed to work best in terms of maximum airflow. I'm waiting for my next batch of braided sleeving to arrive in the mail, so further progress on the helmet and armor will have to wait. I think I'll tackle the boots next since there's no muscle armor to create there.
Tuesday, March 11, 2008
Day 16 - Be Cool
I think I've decided on how to keep myself cool in this suit. I'm going to try installing small case fans in a few areas inside the suit.
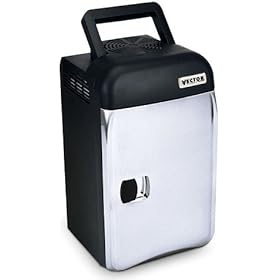
At first, I experimented with the idea of taking apart my old mini travel fridge that stopped working for some reason. It plugged into the cigarette lighter in my car.
[A little backstory: I used this fridge when I moved and drove cross country in my Civic. It was tiny, but it kept a decent amount of food and water chilled during my 10 days across the US (I took my time). Even after I arrived in California, I still kept it as my main fridge since my apartment didn't come with a fridge, and I didn't have the money to buy one (my priorities were towards a new TV, dvd player, and 5.1 surround sound, lol). I used this fridge for SIX MONTHS before I broke down and got a bigger fridge (college dorm room size). Then I took it to work and plopped it on my desk and used it until it died mysteriously. Ah, the memories...] Since I otherwise had no use for it, I took it apart. At first, I tried to do it neatly in case I managed to fix it and wanted to use it again, but the majority of the screws were set about 4 inches deep, and the holes were too narrow for any of my screwdrivers, so used brute force and pried and ripped it open with a pair of screwdrivers. [So sad...] What I managed to salvage from it was some kind of heat exchange plate/heatsink thingy, a case fan, and the plug/power switch. I plugged it in and, as expected, nothing. I took a closer look and couldn't find anything obviously wrong, so I clipped the wires and connected the heat exchanger directly to the 12v power. Worked like a charm. Did the same thing to the fan, and that also worked again.
  Yay! I still can't figure out what was wrong with the switch/circuitboard, but oh well. While I was tinkering with the heat exchanger, I left the fan blowing on my knee, since that was as convenient a place to put it as any while it was running. After discovering the heat exchanger was far too localized for cooling abilities and too big to be of practical use in my suit, I noticed that my knee was quite cool. I think that's when I decided to just use case fans instead of anything (more) elaborate. Now, I'm trying to find some that are as cheap, small, flat, and quiet as I can get. Anyone have any suggestions? I found a bunch of 80mm ones for $2 on Newegg. One of them even gets down to $1.29 with free shipping if you order in bulk (10+ fans). With that deal, it's oddly cheaper to buy 10 than to buy 3. Go figure. The only problem is its size. At 80mm x 80mm x 25mm (or approx. 3"x3"x1"), they're kinda big to try to incorporate into a somewhat skintight suit. I found another one that's 40mm x 40mm x 10mm that's $3 each. Not as good a deal, but much smaller. The other downside is that the reviews are saying they're pretty loud.
Monday, March 10, 2008
Day 15 - Vacuum Forming Part 2
 So I finished my vacuum forming rig (less than $50 total for parts!). Since I didn't have any armor pieces ready to use as a mold, I used whatever was handy that had plenty of detail to test out. This happened to be my vise grips. On the first try, I ended up overheating the plastic (I used one of those cheap plastic "For Sale" signs), and it tore while getting vacuum formed.
 A few tries later with various objects, I fell back on the vise grips again and ended up with the following results by cutting one of those cheap, flimsy 3-ring binders. This shows some promise, but I still need to perfect the combination of which type of plastic, how thick, what temperature to heat it up to, and for how long. In the meantime, I'll work on sculpting the molds with Sculpey clay.
Sunday, March 9, 2008
Day 14 - Vacuum Forming
So yeah, I came across this website with plans on how to make a very inexpensive (less than $50), but good vacuum former. I was aware that a lot of people make their storm trooper armor by vacuum forming, but I had no idea what the process was exactly or any of its other uses. I thought it involved a giant, expensive industrial machine (which it can be), but at its core, it's actually pretty simple: a flat surface with a hole (or holes) to vacuum air out, a mold, and frame-mounted plastic sheet. This video can probably best illustrate what I'm talking about, and it just so happens that this is the vacuum former I'll be making.
And why am I making one, you ask? Since the silver pieces of the nanosuit are so organically shaped (the "skeletal" parts if you will), it would be hard to make them any other way I can think of that would be both hard and flexible. And plus, it'd be so freakin' cool to have one. ;) I'm also thinking it would be a great way to make the base layer of the face mask so it would have a perfect fit by using a mold of the lower half of my face. Plus, the mold would be useful for any other future headgear I'd want to make.
I spent the day cleaning the apartment under orders from my wife ( :P ), so I only had time to buy the parts from Home Depot today before we went to my friend's birthday party.
Okay, so it's pretty late now, so I'll update you all later. Hopefully, I'll have time to build it and show you all pictures of the rig and maybe something I vacuum formed. If not, hopefully Monday.
Tuesday, March 4, 2008
Day 9 - New Armor Sample
 It's been a while since my last post, but I've spent that time designing how to do the muscle armor, and I think I've found a good balance of color, thickness, texture, and comfort. I threw together this sample tonight to see what one of the chest pieces might look like. Looks pretty promising so far. I cut 1/4" thick strips of white EVA foam (craft foam) and stuffed them into the braided sleeving. Then I sealed them tight inside by using a craft hot knife (basically a soldering iron with special tips) to cut/melt the ends. I temporarily laid them out on a 3" wide strip of tape on the back, then put two strips on the front to secure it to my t-shirt. I originally intended on using black foam, but as chance had it, there was a foam and fabric store (mostly for furniture) that only had white. I went for it just so I could get a sample of 1/4" thick foam. That
  thickness was tough to find in the craft stores in my area. They only carried the 2mm thicknesses, not 6mm. Anyways, long story short, the white worked to my benefit, because it added a sense of depth and texture to the braiding. It was no longer black on black. If you looked at it straight on, you could see the white mixing with the black to produce a fairly accurate gray color from a distance. Up close you can see the white a little better (still looks good up close). And at an angle, the white foam gets completely hidden underneath, revealing a solid shiny black.
I think I'll use a similar effect for the helmet, except use 2mm thick sheets instead so it doesn't get too big. The helmet is already a little on the large side. Don't want Nomad to end up with a giant head. :)
Thursday, February 28, 2008
Day 4 - Helmet Mock Up


I made a rough mock up of what the helmet might look like with black and white gaffer's tape. Looking at the stark contrast between the two colors, I think I'll have to do the silver parts of the suit in a dark gray instead of white or silver, because I think there's too much contrast here for a military suit of armor.
Wednesday, February 27, 2008
Day 3 - Speaking of Comfort...

:) Just kidding. If I have time later tonight, I will try to work on the helmet some more.
Edit: I found a pair of boots that look close enough to combat boots at a thrift store down the street from work during my lunch break. I'll post pics when I get home tonight.


Tuesday, February 26, 2008
Day 2 - Armor Sample
 This is a sample of what the armor will look like when stitched to the base layer of fabric. I'm experimenting whether to sew down both sides of each strip to keep the edges from lifting up around curves, which keeps it looking very flat and two-dimensional, or sewing down the middle which lets the edges puff a bit giving the armor some dimension, but will also reveal the base layer underneath. I'm trying to avoid hand sewing it from the back (which is going to be a b*tch and a half), but it may come to that so I can have the best of both worlds: the edges stay down, but the tubes keep their puffiness. We'll see what happens when I order more of the sleeving and the bodysuit.
Monday, February 25, 2008
Day 1 - Part Deux


I made a slight modification to the helmet. I pried off the chin straps (they were riveted to the helmet) since the shell seemed to stay on my head just fine with the new padding, even with moderate head-shaking. I almost definitely need to remove the lenses entirely and fabricate a whole new housing for them. Simply put: my head's too big for them. Too wide, to be precise. Even if I take off the arms or whatever you call them, the frame holding the lenses (is this still plural if it's in one piece?) curves in too sharply to properly go around my face, so they'll have to go. I'm figuring I might need to either use clay to get the exact shape I want or start with clay to use as a mold for something else. Anyone have any suggestions? I might try some of the materials found in this tutorial.
From these two views, you can see that the mouth/face mask isn't wide enough to cover my cheeks like it should, and it sticks out too far past my nose (the reference photos seem to indicate it's about even with the tip of my nose. But as I say, it's a start and merely a platform for building the real thing.
I have a scrap of test armor where I sewed some of the braided sleeving to a piece of gaffer's tape to see how it would look side-by-side like it would on the finished product. But I think I left my red folder that I keep small test items like that and some extra reference photos at work, so I'll have to post pictures of that another day, probably tomorrow.
Day 1 - Reference Photos Collage

As promised, here is my collection of reference photos. Go ahead, shudder at my neurosis. Just to put it into perspective, it's 4' x 4'. The things sticking out at the bottom are the arms of the chair I propped this on.
Day 1 - Gotta Start Somewhere
Since I've already started the project, this first blog will be far longer than any subsequent ones. And I can't really call this Day 1, but just for the sake of argument, we'll go with that. I probably won't even be counting the days anyway from this point forward, but meh, we'll see how it goes. Now, without any further ado...
My first step in starting any of my costumes, especially my more complicated ones like this one, is gathering as much reference photos as possible. Much thanks go to gamespot.com and incrysis.com where I got most of my hi-res pictures I'm using. I started out keeping the printouts in a folder I carried around with me, but after collecting quite a few, they became rather cumbersome to flip through, so I decided to paste them to a giant 4'x4' piece of cardboard. If you just glanced at it from a distance, you'd think I was a crazy stalker (is there any other kind?) with the number of photos pasted on that board. I'll post a picture of it when I get home. I finished it around 1am last night, because I promised my wife I'd clean up after myself when I was done. Cleaning it up at an earlier time before it was done would have been pointless since I would have to unpack it and make a mess again when I go to finish the job.
Before I even compiled my reference photos into a collage, I started researching possible materials for the suit's armor. My ultimate goal is that I wanted the costume to be as comfortable, functional, and real as possible. (Speaking of comfort, this old costume from Half Life 2 wasn't too comfortable sitting down. Standing and walking was fine though, but it got hot fast and it was delicate.) Obviously, I don't have the means to make the suit inject nano molecules into my bloodstream for Maximum Strength or make itself turn invisible with a cloaking feature, but I was hoping at least to make a semi-viable liquid armor which is currently in development today using non-newtonian fluids.
In a nutshell, these fluids change viscosity (how easily they flow) depending on the forces applied to them. Some flow easier with more force applied (like how paint flows easily when stirred but flows slowly when applied to a wall) while others, shear thickening fluids, behave the opposite: they flow slower the more force is applied to them, even to the point of behaving like a solid.
You can even make some yourself at home with a mixture commonly called oobleck (2 parts corn starch and 1 part water by volume). Once it's evenly mixed in a bowl, you can even punch it and it won't splash or even budge. If you let your fingers slowly sink into it and then quickly rake it across, you can see the oobleck breaking apart momentarily like clay, then become liquid again and ooze back to fill in the cracks. Check out this Youtube video of some guys running across a pool of the stuff!
Obviously, the military won't be using cornstarch and water to be protecting our troops in the field. Instead, they are using silica powder (ultra-fine sand) and polyethylene glycol (PEG) in place of corn starch and water, respectively. In a nutshell, they soak layers of kevlar fabric in the stuff, squeeze out the excess in rollers, and let them dry. Once done, they can make kevlar armor that is 20-25% thinner (fewer layers) and still have the same if not better stopping power than kevlar alone. Very cool. You know what's even more cool? You can buy silica powder and PEG yourself online. It's somewhat expensive, but not insanely so. Seeing as how my funds are somewhat limited, you folks will have to test out your own home-brew military-grade liquid armor. ;)
Now back to the costume (after quite an extended tangent). I decided to test out oobleck armor by cutting short lengths of an old bicycle tube and filling it with oobleck. I sealed it up by rolling up the ends and taping it shut (sewing it would have been silly since it would ooze out the needle holes, and I didn't want to glue it because this was a test that would probably need further non-permanent adjustments). In theory, this should work nicely since the actual armor is composed of pieces very reminiscent to bundles of muscle fibers, and I can arrange these tubes in a pattern to match the armor. I made a few of these, and taped them side-by-side to simulate one of the chest pieces. Now the test: I held it up against a wall and punched it. :) Obviously, I didn't start off hitting it as hard as I could, but I eventually worked myself up hitting harder and harder each time. By the end, my knuckles were turning red, but no pain from punching the wall! Yay! Now the bad news: I hefted my collection of oobleck armor tubes and estimated that the final armor would be WAY too heavy to be comfortable. Oh well, it was fun playing with the oobleck anyway, and it only cost me a box of cornstarch which we use for cooking anyway, so no big loss.


So...after much blabbing, that's where I'm currently at for Day 1 (whew, I'm tired. That was a log of work for just one day, lol). As far as my plans for the costume, I'm going to order a spandex/lycra bodysuit (with the face cut out) as a base layer from which to attach all the armor pieces. I want to attach a bluetooth headset to the helmet so I can talk on the phone. I haven't decided whether I'll keep the phone in a hip pouch or attach it to my wrist as a pseudo wrist display/computer. I also want to attach a walkie-talkie headset for the same reason for my FRS set I have. For the Push-to-Talk (PTT) button, I'll wire that somewhere down to my hand. I expect this suit might get pretty hot, so I'm going to see if I can fix the fan for my portable car fridge and install the guts of that somewhere on the suit. Probably on my back. I'm going to install some red LEDs for the lights scattered throughout the suit (I believe they're for cloaking in the game). For any wiring I have to do, I'm going to run them through the braided sleeving conveniently laid out everywhere on the suit. The batteries to run everything will be mounted in those hip pouches.
I'm not sure yet what I'll use for the white/silver armor pieces on the suit. I have a few ideas I'll try out, but we'll cross that bridge when we get there. Till next time!


