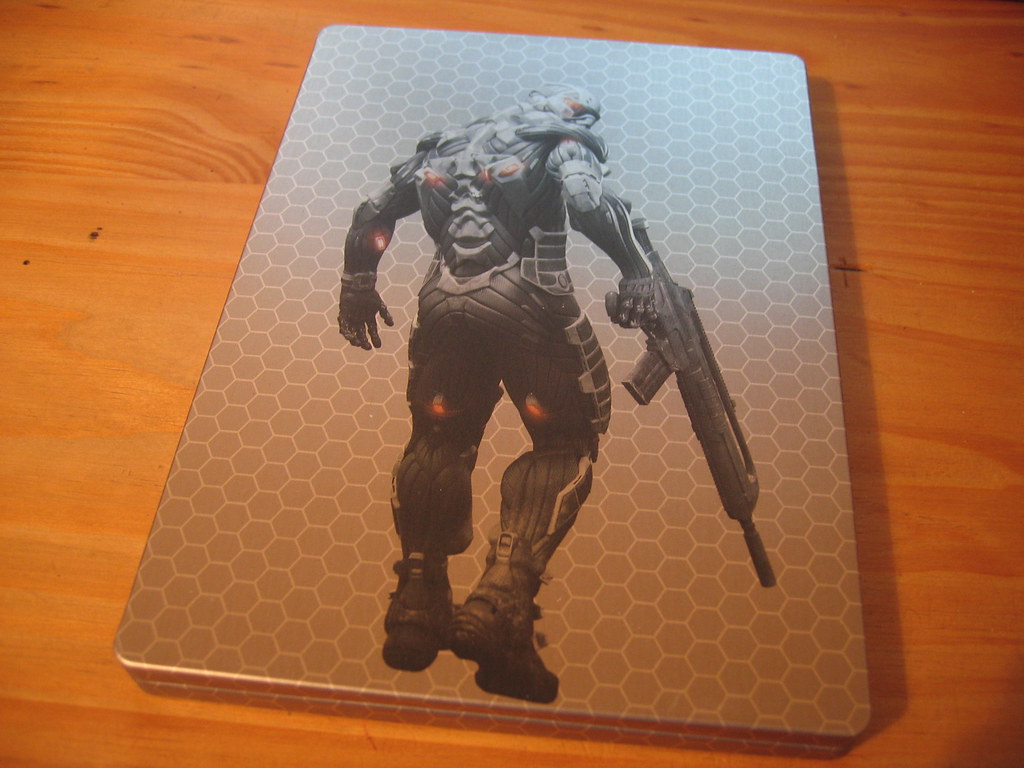
 At the behest of my wife, I'm starting a blog about my trials and tribulations in creating my nanosuit costume from the PC game Crysis. For those of you not familiar with the game, go to nanosuit.com for more info on the game itself. This blog will cover not only the creation of the costume itself, but also any cool related tidbits I've discovered and researched along the way (and as you can tell from the links, I'm quite the fan of Wikipedia).
Since I've already started the project, this first blog will be far longer than any subsequent ones. And I can't really call this Day 1, but just for the sake of argument, we'll go with that. I probably won't even be counting the days anyway from this point forward, but meh, we'll see how it goes. Now, without any further ado...
My first step in starting any of my costumes, especially my more complicated ones like this one, is gathering as much reference photos as possible. Much thanks go to gamespot.com and incrysis.com where I got most of my hi-res pictures I'm using. I started out keeping the printouts in a folder I carried around with me, but after collecting quite a few, they became rather cumbersome to flip through, so I decided to paste them to a giant 4'x4' piece of cardboard. If you just glanced at it from a distance, you'd think I was a crazy stalker (is there any other kind?) with the number of photos pasted on that board. I'll post a picture of it when I get home. I finished it around 1am last night, because I promised my wife I'd clean up after myself when I was done. Cleaning it up at an earlier time before it was done would have been pointless since I would have to unpack it and make a mess again when I go to finish the job.
Before I even compiled my reference photos into a collage, I started researching possible materials for the suit's armor. My ultimate goal is that I wanted the costume to be as comfortable, functional, and real as possible. (Speaking of comfort, this old costume from Half Life 2 wasn't too comfortable sitting down. Standing and walking was fine though, but it got hot fast and it was delicate.) Obviously, I don't have the means to make the suit inject nano molecules into my bloodstream for Maximum Strength or make itself turn invisible with a cloaking feature, but I was hoping at least to make a semi-viable liquid armor which is currently in development today using non-newtonian fluids.
In a nutshell, these fluids change viscosity (how easily they flow) depending on the forces applied to them. Some flow easier with more force applied (like how paint flows easily when stirred but flows slowly when applied to a wall) while others, shear thickening fluids, behave the opposite: they flow slower the more force is applied to them, even to the point of behaving like a solid.
You can even make some yourself at home with a mixture commonly called oobleck (2 parts corn starch and 1 part water by volume). Once it's evenly mixed in a bowl, you can even punch it and it won't splash or even budge. If you let your fingers slowly sink into it and then quickly rake it across, you can see the oobleck breaking apart momentarily like clay, then become liquid again and ooze back to fill in the cracks. Check out this Youtube video of some guys running across a pool of the stuff!
Obviously, the military won't be using cornstarch and water to be protecting our troops in the field. Instead, they are using silica powder (ultra-fine sand) and polyethylene glycol (PEG) in place of corn starch and water, respectively. In a nutshell, they soak layers of kevlar fabric in the stuff, squeeze out the excess in rollers, and let them dry. Once done, they can make kevlar armor that is 20-25% thinner (fewer layers) and still have the same if not better stopping power than kevlar alone. Very cool. You know what's even more cool? You can buy silica powder and PEG yourself online. It's somewhat expensive, but not insanely so. Seeing as how my funds are somewhat limited, you folks will have to test out your own home-brew military-grade liquid armor. ;)
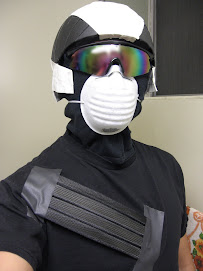
Now back to the costume (after quite an extended tangent). I decided to test out oobleck armor by cutting short lengths of an old bicycle tube and filling it with oobleck. I sealed it up by rolling up the ends and taping it shut (sewing it would have been silly since it would ooze out the needle holes, and I didn't want to glue it because this was a test that would probably need further non-permanent adjustments). In theory, this should work nicely since the actual armor is composed of pieces very reminiscent to bundles of muscle fibers, and I can arrange these tubes in a pattern to match the armor. I made a few of these, and taped them side-by-side to simulate one of the chest pieces. Now the test: I held it up against a wall and punched it. :) Obviously, I didn't start off hitting it as hard as I could, but I eventually worked myself up hitting harder and harder each time. By the end, my knuckles were turning red, but no pain from punching the wall! Yay! Now the bad news: I hefted my collection of oobleck armor tubes and estimated that the final armor would be WAY too heavy to be comfortable. Oh well, it was fun playing with the oobleck anyway, and it only cost me a box of cornstarch which we use for cooking anyway, so no big loss. Even when I was still playing with the idea of using bike tire tubes for armor, it still didn't have the texture of the nanosuit armor I was looking for, so even if the oobleck armor worked out, it would still need to be covered with something to give it the right look. After a little brainstorming, I came upon the idea of using expandable braided sleeving used for organizing cables. The braiding pattern would look nice, it's flexible, and it will conform to different shapes (with limits) so it seems like the perfect material for muscle-like flexible armor. It's not too expensive here at $.50/ft for a bulk roll of 3/4" x 75' or more. If anyone finds a better deal, let me know! I'm not sure how much I'll ultimately need, but as a rough estimate, I measured myself to figure out how much surface area I have on my body (diameters of my torso, arms, and legs times their respective lengths) and figured I would need approximately 350' of this stuff. Obviously, it won't be exact, because there are smaller widths used in some areas, the mouth/cheek area for example. As for color, I decided on black. I know the actual armor is more of a graphite/dark gray, but I figure black will be easier to work with in terms of matching colors with everything else. I didn't want the costume to be a mish-mash of different shades of gray because I couldn't match the colors exactly, and black is easily matched and accessible (and cheaper!).
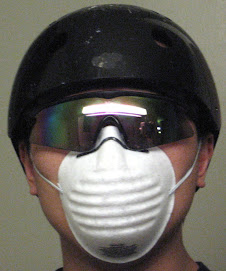
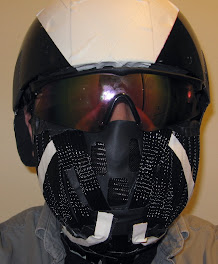
 I've started work on the helmet. Due to what seems to be the size and shape of the helmet (somewhat form-fitting), I bought a used child's skateboarding helmet and gutted the foam padding inside. With just the outer shell, it was just a little bit bigger than my adult-sized head, so I re-padded it. Since I don't need this helmet to protect me from any actual head injuries (yeah, I know it's stepping away from my goal of real/functional armor. So sue me), I replaced the hard foam with layers of soft craft foam glued together (follow the link for the tutorial I used to make my Half Life 2 costume). Doing it in layers allows me to fine-tune the fit so it's just right for my head. For the goggles, I'm starting off with a pair of safety glasses I bought from Sears for 8 bucks. My original idea was to modify ski/snowboard goggles, since they already have the st
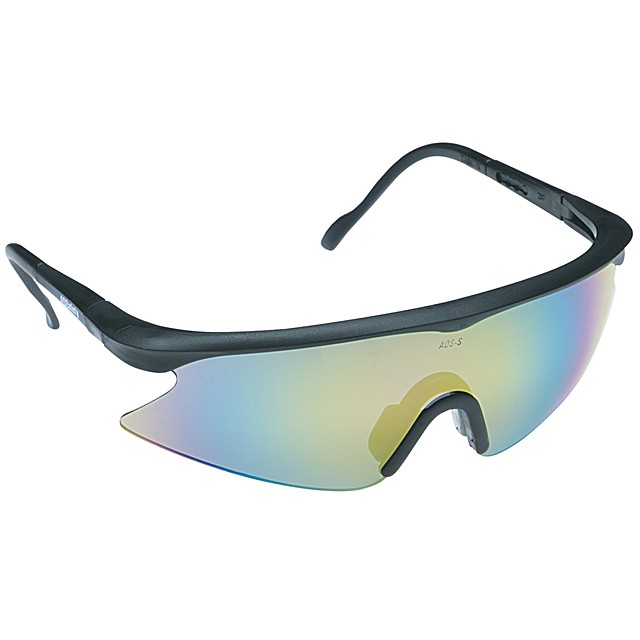
So...after much blabbing, that's where I'm currently at for Day 1 (whew, I'm tired. That was a log of work for just one day, lol). As far as my plans for the costume, I'm going to order a spandex/lycra bodysuit (with the face cut out) as a base layer from which to attach all the armor pieces. I want to attach a bluetooth headset to the helmet so I can talk on the phone. I haven't decided whether I'll keep the phone in a hip pouch or attach it to my wrist as a pseudo wrist display/computer. I also want to attach a walkie-talkie headset for the same reason for my FRS set I have. For the Push-to-Talk (PTT) button, I'll wire that somewhere down to my hand. I expect this suit might get pretty hot, so I'm going to see if I can fix the fan for my portable car fridge and install the guts of that somewhere on the suit. Probably on my back. I'm going to install some red LEDs for the lights scattered throughout the suit (I believe they're for cloaking in the game). For any wiring I have to do, I'm going to run them through the braided sleeving conveniently laid out everywhere on the suit. The batteries to run everything will be mounted in those hip pouches.
I'm not sure yet what I'll use for the white/silver armor pieces on the suit. I have a few ideas I'll try out, but we'll cross that bridge when we get there. Till next time!
Monday, February 25, 2008
Day 1 - Gotta Start Somewhere
Subscribe to:
Post Comments (Atom)


3 comments:
yay for reena im glad you making a blog for this. progress, and final product too. i dont know what i could help in but anymore shoutouts for stuff and ill be sure to pitch in any time.
that is SOOO awesome! i can't wait til you're further into production and have something substantial for me to see. :D
Hi! from Spain...
I'm in the pre-process of making this costume or Half-Life2 HEV suit... I'm gathering info, images, materials...
The nano suit I think it's the most difficult to create (Halo, Star Wars, and Half Life are a bit easier) but the muscle's structure is really hard to reproduce...
Well ! Be lucky!
Post a Comment